From Buns to Loaves: Baking The 4th Edition Nutritional Dough in Cast Iron
From Buns to Loaves: Baking The 4th Edition Nutritional Dough in Cast Iron
This blog post explains how to bake the 4th Edition Nutritional Dough Formula as large bread loaves instead of individual buns using cast-iron pans.
When you scale a dense, high-inclusion dough up from 100g buns to a large 1kg standalone loaf, the physics of your bake shift completely. Without structural containment, a large freestanding loaf will naturally want to pancake outward under its own weight. Transitioning to heavy cast-iron rugbrød (loaf) pans completely solves this issue. The high, vertical iron walls provide permanent structural containment that forces the dough to expand upward rather than outward.
Furthermore, cast iron acts as a heavy thermal engine. It absorbs heat slowly but radiates it with immense, steady energy directly into the sides and bottom of the bread. This deep thermal radiation is critical for driving heat entirely through the dense, moisture-heavy core of a large loaf, ensuring it bakes completely through without leaving a gummy center.
Here is the exact technical execution guide to guarantee success when open-pan baking with cast iron.
Technical Execution Guide: Open-Pan Cast Iron Baking
Step 1: The Non-Stick “Bearing” Matrix
Because heavy doughs can easily fuse to bare metal during a long bake, you must build a durable physical release layer inside a cold pan:
The Base Layer: Coat the entire inside of the cold cast-iron pan generously with a solid fat, such as vegan butter or coconut oil, paying close attention to the tight corners.
The Coarse Particle Dusting: Add a tablespoon of semi-coarse durum flour (semolina) or coarse cornmeal into the greased pan. Shake it around vigorously until the bottom and side walls are completely carpeted, then tip out any loose excess.
The Structural Logic: Unlike fine flour, which dissolves into melting butter to form a paste, coarse durum granules act like hundreds of microscopic roller bearings. They create an intentional, microscopic air gap between the cast iron and your dough. This allows steam to vent smoothly along the edges and guarantees that the finished loaf will slide out of the iron instantly with zero friction at the end of the bake.
Step 2: Shaping and Loading
Perform this step after your dough has completed its long cold fermentation and warmed up on the counter:
Turn the dough out onto a lightly floured work surface and divide the total batch evenly into two equal pieces.
Pat the dough flat into a rough rectangle, then roll it up tightly into a firm, high-tension cylinder (log) that matches the physical length of your pan.
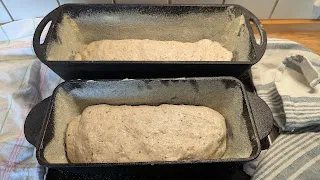
Drop the cylinder seam-side down into your prepared cast-iron pan. Using wet hands, press firmly down across the top surface to force the dough completely into the bottom corners, creating a flat and level top.
Step 3: The Pan Proof
Cover the loaded pans with a damp cloth or plastic wrap to prevent a dry skin from forming on the exposed dough.
Let the pans sit undisturbed on the counter for 45 to 60 minutes. Watch for the surface to crown slightly and form a subtle dome near the top lip of the iron.
The Oven Setup: Halfway through the proof (at minute 30), preheat your oven to 240°C. Place a heavy metal baking tray filled with lava rocks (or an empty cast-iron skillet) on the absolute bottom rack of the oven to serve as your steam generator.
Step 4: The 3-Stage Open-Pan Thermal Profile
Uncover the pans completely. Do not score the top surface and do not use a lid on your rugbrød pans. An open loaf pan naturally channels expansion vertically, whereas using a lid would trap a high-moisture “sauna” environment that prevents the crust from stabilizing or browning properly.
Stage
Temperature & Duration
Baking Action & Environment
Stage 1: Vertical Lift
240°C for 20 Minutes
Slide the cold, loaded cast-iron pans onto the middle oven rack. Immediately pour 1 cup of boiling water over the preheated lava rocks on the bottom rack and shut the door instantly. This manual steam injection keeps the top crust elastic while the iron sides begin heating up, driving a tall, uniform vertical rise.
Stage 2: Core Penetration
210°C for 25 Minutes
Open the oven door for 10 full seconds to completely vent all remaining steam from the oven cavity, and remove the water tray from the bottom rack. Drop the oven temperature to 210°C. The fully heated cast iron will spend the next 25 minutes radiating steady, intense thermal energy directly into the center of the loaves to cook the core completely through.
Stage 3: The Naked Crisp
190°C for 10 Minutes
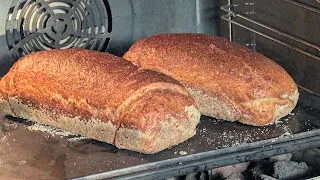
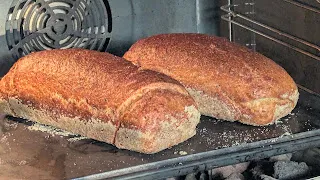
Carefully tip the pans over and slide the hot loaves completely out of the cast iron. Place the naked loaves directly onto the bare oven rack, drop the temperature to 190°C, and bake for a final 10 minutes. This directly evaporates any residual moisture trapped along the outer edges, producing a clean, firm, crisp crust.
The Cooling Protocol
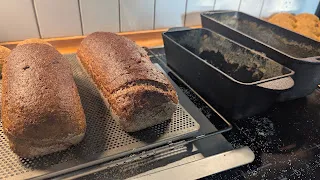
When you pull the loaves from the oven, they must be transferred immediately to a wire cooling rack. Let the bread sit completely undisturbed for at least 3 to 4 hours until it is cold to the touch. Slicing a large loaf while it is still warm causes the internal steam to escape too rapidly, which compromises the crumb structure and causes gumminess. Letting it cool completely allows the interior to set flawlessly, ensuring c
lean, razor-thin sandwich slices for your daily lunches.